Showing posts with label canon. Show all posts

Tuesday, 4 May 2010

Food mmMMMMmm

Food
I like food. I really love good food. In another life I may have even been a restaurant critic. Creating things is something that I enjoy doing and I do that with the photography. Creating good food is not my calling but eating it is. I do have a friend though that is really good at creating really good food. His name is Noel and he is the head chef at a real nice restaurant here in SA in a suburb called Westville. The restaurant name is Salute they do Italian style food.

I like new projects and thought I would try do a bit of food photography. Who better to help me with my food project than Noel. Noel is as passionate about his food as I am about my photography. Noel studied to be a chef and is gaining some wonderful recognition and has been in the local papers a few times recently. The restaurant critics find his food wonderful. An interesting fact abut Noel his creativity is not just in food. He is the vocalist in a band called Cynical Origin just in case you are wondering they are a Metal band - Rock on. One of the things a chef will learn at chef school is the client must eat with their eyes first. So to do this the chefs are taught about colours and presentation. Noel is damn good at presentation - the part that's really important to photograph.

Now photography is all about truth and reality. Yea Right. Truth about food photography is this. Unless you are selling the food directly in the photograph you can do anything you want. Fast food outlets need to be photographing real food for their menus. In other words if it is a burger with onions etc on the menu then the photo had to be taken of actual beef pattie and real onions. But who said it has to be a cooked pattie or onions without food colouring. If the food on the menu looks really good is the lawful representation then chances are if you had to pick up that exact burger that was photographed on that menu and took a bite you would get a mouth full of tooth picks, chemicals and raw meat and if you are really lucky you wont die.

Real food is hard to get looking really good unless you name is Noel. I decided a while back that real food is what I would like to photograph. I did a bit of reading on how food stylists do the food you will see in publications etc. I may look good but that's it. Most of the food you see in those pictures are not even edible. Seems a bit like cheating to me. Its a little like this "Heres this car I want you to photograph but I don't want you photograph the car you drive away with you must photograph this car with these crazy modifications that we have done that makes it impossible to drive it ever".

The food you see here is real and what you see is as it would be served to the hungry client sitting at the table. Lucky for me as I got to sample one of the dishes. Well did it taste as good as it looked? You better believe it. Since taste-o-vision and smell-o-vision is not widely available yet pictures will have to do.

One thing that I can say working with restaurant staff is use their experience. They know the real deal how long until the next plate to photograph will arrive and what is the right accompaniments to go with the food. Wine, condiments etc. Approach them with a positive attitude and show them some of those pictures they even start coming up with some great ides some you can and some you cant use but get them on you side and it makes you life a lot more simple. Noel was also really accommodating he would ask "what would you like next more height different colours". When this is you first time photographing food seriously having someone helping you by plating the food in a photograph friendly way does really help.
Just remember that the really fancy food photographs you see have been styled by a food stylist. What is a food stylist? you maybe wondering well their job is to get the food looking good that's it. They not interested in the photography. Thats your job. The food stylist will correct something that's showing or not showing on the food. They are not interested in Ive got a hotspot etc. That is partly the reason I wanted to do this shoot. It was to get a bit of experience with how to light the food, looks to go for, background, settings etc. To add context to the food the background is as important as the food.

In these shots the restaurant was open and serving customers so I could not really light the whole place and kick customers out the way. The restaurant sorted out a nice spot away from the rest of the tables. I could work and do what I needed to do with out being disturbed which was nice of them.
The lighting was not overly complex 3 speedlites. 2 set about 45 degrees either side of the camera and one as a background light. The two either side of the camera were in soft boxes. The background light was in some of the pictures fired bare onto a red wall and others through a red glass candle holder. I used the ETTL functions on the flashes and the nice thing about it was I could just dial in a 2:1 ratio between my key and fill flash and done. The bonus is that I can even do it from the camera and I don't even need touch the flashes. The only flash I did need to touch was the background light as it was not the most stable in the round candle holder on the floor. The shutter speed was about 1/200 and the aperture ranged between 2.8 and 7.1. I was using my Canon EF 24-70 F2.8 lens and dialed into my camera a +1 stop on the flash compensation. the reason is the camera will see the white plates as a serious highlight and back the flashes a bit. Post was just a bit of a crop and levels and a touch of vibrance to bring out the lovely rich colours of the food.

There are a few things I will do different in future I will be pulling the table cloth very straight. The other thing is working on getting something cool in the background. When I look at the photographs they are good but Imagine if I could get some of the restaurant and decor in the background. If done properly it would give more interest and context to the food. If I put the food on a bar it would imply a pub lunch or if a forest was in the background it would imply a picnic or or or - as if you could lug this out there. But you get the idea. I am happy with the photos.The food is well represented and looks yummy.

Saturday, 13 March 2010

An extraordinary model

Pictures from shoot at studio
Model/s: Jana
Make-Up: Ebony
Photographer: Henrik

Equipment : Canon
Focal Length : 24-70 F2.8L 70-200 F2.8L
Aperture : F11 - F13
ISO : 100
Shutter speed : 1/160

I would like to start off by thanking all involved.
Thank you Thank you and Thank you.

now to parts that count What has happened to the Blog?
We have been working on the website so sorry Blog is really not getting regular updates
www.htfotography.co.za is where one can see some of our galleries etc.

As for the picures. I was reading a book and in the book ( yes I can Read) it said that to really make a wow picture one should use a good looking model. And its a sound piece of advice. That sound piece of advice does not really extend to the other pitfalls surrounding that piece of advice.
OK so you book a good looking model. Great only problem is the model probably went out partying the night before oh and did I mention she probably has boyfriend/girlfriend issues and a whole lot of other issues and maybe even some more in closet stuff etc. that he/she has to tell someone , that someone is normally you, and this has to be done before we can even get makeup near her or on her. OK OK I admit models are not the most reliable of creatures but every once in a while you get a model that looks great comes pretty well prepared and wants to make great photos. I have been fortunate to work with a few of these models and from a photographers point of view it is a whole lot easier to get great pictures when you work with them. The model that arrives on time and ready will get better photos at the end of the day because the photographer can now concentrate on getting good shots and not worrying about saying something that will cause tears etc. On this shoot another model was supposed to be there but she did not pitch. Jana was on time and prepared etc. When she heard that the other model was not going to be there the attitude was great more time to spend being photographed. As it turned out the extra time spent with her gave me some really great extra looks. Ebony did the makeup on this shoot and Im real happy how the whole thing came out.

Jana was a fantastic model and really easy an fun to work with. She clowned around and we all had fun when a model is at ease the best shots are captured. Even though we shot some sinister looking stuff there is a glint of something in the eyes and that seems to make all the difference in the shots.

The photography side was simple has Zack Arais has a wonderful tutorial on seamless white background check it out. www.zarias.com
I used the tutorials and a bit of experimenting to get the photos to way I wanted them.

As for post just a little bit of correcting here and there added a lighting effect for one and a bit of vignetting across the board. Black and whites where converted using the red channel mostly. The reason being the red filter makes the skin tones look better and lighter in black and white.

And there you have it folks some good solid photos.


Sunday, 23 August 2009

The 3 Second Question !

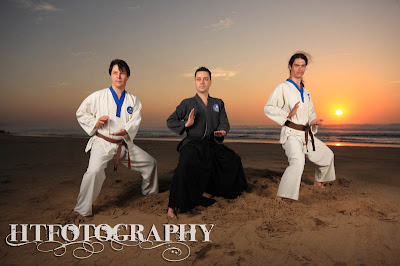
Pictures from shoot at Durban Beach front for Kushido
Model/s: The Karate Crew
Make-Up: maybe not - Or maybe ask Mauro I dare you - Just kidding
Photographer: Henrik

Equipment : Canon 40D
Lens: Sigma 10-20 F4.0-5.6 EX
Focal Length : 11mm
Aperture : F11
ISO : 400
Shutter speed :1/30

Oh it has been a long time since I have posted I do apologize.

I blame life in general – bad life now go and let me have more time for blogging. I wish it could work like that. But between photo shoots, placing ads and doing the fatherly thing and business side of HTFotography I have not updated the blog in a while. Well here goes Im going to do a few different posts in rapid succession I hope this being the first.

A friend of mine does karate. He seems to enjoy it quite a bit and it keeps him and fit and focused. He is quite involved in his karate. Very involved in his karate actually, he and his wife spend 4 evenings a week at training. The Dojo (classroom in Japanese) that they train at teaches self defence, self discipline and weapons skills (not the guns and ammo type weapons skills) and other thing is when they spa it is full contact sparing. Ok so no blood gets spilled, hey this is not fight club but it would be cool if it were and would make for great photography although it may require lots of equipment cleaning hmm.Let us consider this for a moment, cleaning blood off the equipment, bad, fight scenes, good, possible ambulance scenes and paramedics, good, hmm so much to consider. I won’t worry about the participants hey Im taking their photo after all. I will have to think about a different avenue of photography – Does anyone have an unused basement or alley? Anyway moving on to something that does not require too much camera equipment cleaning and a blood commitment.


The idea of this shoot started off very simply - As in not at all. My friend suggested to me that I photograph the kids at his Dojo during and after their grading. He put me in contact with is Sensea – Pronounced Sen – Say which means teacher in Japanese. For the uninitiated the grading is when they learn a routine and carry out their routine in front of the instructors. All the parts of the routine are made up of a series of moves. Each move will either block a punch or a kick etc. or throw a punch or kick etc. The instructors assess the skill and proficiency at how the kata (literal meaning is form -but I read routine) was carried out and if the student carried it out with sufficient skill they will progress to the next level where they will learn more routines and moves. Oh and just in case you are wondering the kids don’t get to play full contact with weapons only the adults get to do the silly things like that.


So I decided the one evening to go around to his Dojo to get a feel for how many kids what kind things they do and all that. Well I saw the kids and it was cool I believe the skills they learn will help later in life. I don’t just mean the moves but the learning the discipline and the eye for detail. I also stuck around to see the adults. That was a bit different. It was something like watching fluid moving art and things in the brain started to grind and it muttered those profound words of ‘I want to capture that’. Which was quite impressive since I had a serous headache that evening. And well that’s how it started. Karate people at the beach with a sunrise in the background.


The next part is not the highlight of my photographic endeavours. Yes we all make mistakes but I blame the camera. Ok maybe not I wish I could but the reality is this - my photographic brain was faulty that morning. Yea I will go with that one. Hmm sounds plausible enough. I had to do this shoot twice. The first time I shot this I made a basic mistake, Yes I did not use a tripod. And yes you can all kick me now. Ok you can stop now it hurts. It’s a good lesson to one and all, just because you have all the flashes and the panels and rubbish that goes with it, it is the basics that will ensure you don’t screw up a shot. The basics – The basics I tell you!!! So this is where I show you where things went wrong.


Here is a photo of the Sensei - Mauro a nice guy. He is cool and by the way he went to Japan to study with the old masters to learn the correct karate technique oh and did I mention he’s been doing karate since he could walk or just about. So he really knows his stuff. So that black halo around him is not the black halo of karate coolness it is the in fact the black halo of slap-that-photographer-up-side-the-head-hand-held-preventable-camera-shake uncoolness they can be easily mistaken but it really depends on whether or not the client gives you a second chance or not. So some people may want this black halo look but not me. It really is not that hard to achieve take the picture let the flashes pop and let the shutter stay open a while and shake the camera slightly hey there you go – the black halo of coolness or uncoolness appears.


I pretty sure Mauro could take out a guy in about 3 seconds flat or there abouts. With that in mind imagine the happy and not so happy emotions that were going through my head as I was looking at the photos on my computer screen murmuring something like ‘I’m going to get hurt.’ I remember when I was shooting, the pictures on the camera back looked good no black halos. But to be honest I should have engaged the brain a bit harder to help the already failing photographic brain. Black halos all round maybe was caused by the CF card being in the camera too long because while shooting everything is good and as soon as the images stay on the card for some time they conspire to turn blurry or ugly or some suddenly want to overexpose or underexpose. Or not! Hey Im trying to think of good excuses for a re-shoot with the client. Well considering I had to haul Mauro and his band of merry men out of bed and have them meet me at Durban beach front at 5:30 in full kit to pull poses and mock fight slowly so I can capture the moves. I did not believe he would be very happy. So I worked feverishly trying to salvage those pictures to no avail. There does not seem to be a ‘remove black halos and blend really nicely and look natural button’ on any of the post processing programs. Tried retouching one picture and about 45mins in it was plain to see this was not working. Next best option was to work on a few of the salvageable pictures and ditch the rest and then ‘The Call’ had to be made. Fortunately I had spent a little bit of time with adults class one of the things Mauro said to his class and it was making reference to the kata the students learn, was when you are being graded you may look good and doing the moves correctly but only you in yourself know weather or not that was your best performance. An interesting little gem of wisdom. It is very similar in my photography. I, in some way feel every time I photograph something for someone it’s little like I’m being graded. I am also the only one the really knows if I can do better or if that was my best. So with the 3 second kill move and that little gem in mind ‘The Call’ was made It went something like ‘Hi Mauro how you doing?‘ ‘Hi good thanks and how are you doing?‘ ‘Well and, well not so good I would like to redo the shoot…. ‘ there was a pause – I wondered if he was thinking of his 3 second kill move. And then the ‘OK but why?‘ answer. Phew no 3 second kill move I hope. So I explained about the black halos of karate coolness and all that and I also added ‘I can do A LOT better!’. So I took along the rescued pictures to Mauro and found he liked them. Now all I had to do was nail the 2nd shoot or Im sure I would have experienced the 3 second kill move.


Fortunately for me I did, at least I think so. So another wake up at 4:00am and get to the beach with all the equipment at 5:30am all ready to shoot. Joy.

The real life dependent shoot was done with 3 flashes a diffuser panel and an umbrella. Again I wish I had full set of radio poppers or pocket wizards etc. The flashy flashy TTL thing is pretty crappy and very unreliable not that anyone else’s flashy flashy system is any better but that’s my rant on the matter. Im starting to get to grips with the TTL metering system more and more but I do find it is still a bit cumbersome. All the photos were done using the ETTL system with +1 or -1 dialled in. All the flashes were on channel 1 and group A. A 1m x 1m panel diffuser panel was used and that was camera left and an umbrella was used for a bit of fill and that was camera right. I used a Canon 580EX II as the master on a TTL cable. This is great and until I can get the fancy pocket wizards to keep the ttl functionality this 7.5m cable is the best thing to trigger the flashes off camera and maintain hi speed sync, zoom etc. The 580EX II was on a light stand and was clamped right next to one of the 430 EX’s so they shared the load of lighting the 1m x 1m panel. The other 430EX was behind the umbrella which is where the flashy flashy rubbish falls down. I had to position the flash in a way that the flash sensor could see the 580’s trigger signal. And since the

trigger has to go through a diffuser panel its not the most reliable. But luckily for me it started working after a little bit of moving around, positioning of the umbrella, an incantation

followed by a blood ritual and the throwing of holy water. Well maybe not the blood ritual or the holy water but definitely the incantation. I had to use all sorts of things to try weight down the diffuser panel’s stand as the wind picked up a bit. The setup pretty much stayed as is due to having to hold everything weighted down. From there on it did not go too badly the TTL seemed to work nicely a few times the flashes would get upset but generally the system worked well as we went a +1 flash compensation -1 and so on depending on where the karate guys positioned themselves. I shot on manual to control the ambient and let the system decide how much flash it needed to expose correctly. I was also using the Sigma 10-20 F4.0–5.6 EX wide angle lens. I like this lens quite a bit actually more and more as I use it. I would like to get a 17-40 or a 16-35 when I get a full frame camera but for now on my cropped frame sensor 40D this lens rocks. I normally use canon L series lenses for all my work but I thought I would buy the highly rated Sigma to see how the wide angle suits my photography. For the cost of the lens, the quality and images it delivers you get a lot for your money. My L lenses are still better but I got to say the Sigma is not too bad. I thought I will try to get some interesting perspective shots. I wanted to do a few shots that felt like you were about to get smacked by the various weapons. The bow (or long stick) I thought was quite nice.


Most of these were shot at between F11 and F13 and ISO 400. The F11 and up was to get sharp results and the depth of field The noise does not seem to be bad at all the only real place it seems to be noticeable is in the very dark shadow areas in the background. A light application of Canons DPP software noise reduction seems to sort it out nicely. The only post processing is really white balance and a bit of a touchup on the bottom left where the light spilled the problem is they needed to be close enough to be lit properly and I could not really move much around. If I had a black cloth I would have killed the spill but I did not have anything that would work so fixing in post, it would have to be. The posing side was easy and went something like this ‘OK guys what poses would you like to do?’ and that was that really. ‘I’ll do this’ and then after a few frames ‘I’ll do that’ and pose after pose it was dynamite stuff after all this is the real thing that soo many B grade movies have been based on. Not to say these guys are in anyway B grade. I just recall in the movies the characters pulling moves and stopping for a second before attacking. That is seemingly what a lot of the 80’s B grade martial arts movies were about. Enter, Pull a Move, Attack unconvincingly get knock about get up have a second go and knock out the ‘baddie’. Repeat scene 4 – 5 times during movie.


A few things I would like to have done better is on the diffuser panel there was some light spilling from the flashes on the ground that needed to be sorted out in post. I think I will need to mod it a bit to include a black cloth to stop the spill. Another thing is the white and black suits are cool but that black suit pants that Mauro was using has to be one of the most light sucking things I’ve come across in a long time. Maybe a snooted flash on just his clothes would have helped. The other thing I’ve come to realize is the need of a dedicated assistant. That would save me a lot of time and grey hairs. Another shoot I did the pictures came out Ok but I feel if I had spent less time worrying about moving the lighting, hand holding a flash, balancing with my camera dangling about etc. and more time on posing the couple moving to a different locations and concentrating more on the things that make a good photo it could have been even better. But that at least will be remedied soon I hope.

Photographer: Henrik
Equipment : Canon 40D

Lens : Sigma 10-20 F4.0 - 5.6 EX

Focal Length : 16mm
Aperture : F13
ISO : 400
Shutter speed : 1/250th


Photographer: Henrik
Equipment : Canon 40D

Lens : Sigma 10-20 F4.0 - 5.6 EX

Focal Length : 12mm
Aperture : F11
ISO : 400
Shutter speed : 1/250th


Photographer: Henrik
Equipment : Canon 40D

Lens : Sigma 10-20 F4.0 - 5.6 EX

Focal Length : 14mm
Aperture : F13
ISO : 400
Shutter speed : 1/250th


Saturday, 23 May 2009

The Halloween Serial , The Goul and the Ghost (Part 2 & 3)

Pictures from shoot at HT Fotography Studio
Model/s: Alan and Eve you can guess who is who.
Make-Up: Ebony
Photographer: Henrik

Equipment : Canon 40D & 24-70 f2.8
Focal Length : 45mm
Aperture : F7.1
ISO : 100
Shutter speed : 160


Equipment : Canon 40D & 24-70 f2.8
Focal Length : 42mm
Aperture : F11
ISO : 100
Shutter speed : 160


These Photos are my next installment to my Halloween series. Part 2 and 3
So I have been in the UK for a while and boy did it seem to go very fast. I can tell you that as fast as it seemed to arrive getting the bags ready and all that, the faster the time seemed to go. And now I'm back in sunny South Africa. The blog was not updated due to not having a monitor I was sure of and the various tools that are needed to post process these little monsters. And when I was siting in front of a monitor that was good I was just backing up the photos I had taken that day. There are soooooo many photos - Damn that 6.5 frames per second. In my cameras defense there is a moron who keeps holding the shutter release button down so anyway. The reason I do this is I live in the hope I will get a sharp frame or two in the batch. I can tell you it works for me. I learnt a lot from my little travel experience like what equipment to take and what not to. Before I left SA for my world tour (I wish unless world is UK and Denmark) I phoned up my friend Alan and the call was something like this. H-"Hi Alan how you?" A-"Good" H-"Alan would you like to look like a Ghoul next Saturday?" A-"hmm Cool" H-" 9am good for you?" A- "Yea see you then"
I got to say that it was about the most easy bunch of convincing I ever had to do. I sort of thought he was not going to be there because perhaps he thought it was a joke. Sure enough though he was there.
Ebony was also there to do make-up That was a bit more of a task to get her there. Ebony is on board with me 110% on this project and with out her there would be no Halloween serial. Here is the challenge. Ebony has many talents and uses just about all of them. I mean to just give you an idea she designs dresses and makes them, she does tattoo designs and the tattoo artists put them on skin, she is the lead singer on a metal band called Theater Runs Red that is doing well at the moment and travels South Africa playing gigs, she also does theatrical make-up and fashion make-up and does body painting and wedding make-up. There are so many other things she does I cant even remember half of them. Needless to says she is very very busy. So for my schedule and hers to align I can tell you its difficult so if I can get a gap in her schedule I move mine.

On to the shoot. The setup was very similar to the last one (jack-o-lantern) and with the exception of a few strobe height adjustments Ghoul and Ghost were the same. The reason for this is that the look Im going for is controlled by the light. Im trying to create a similarity between the characters so the dramatic look needs to stay constant. Basically I think it has.

The shoot is simple the background is a black cloth simple as that. The light (as in one) is a single strobe on the left shot through a large softbox. It is in close and reasonably low power. I was after a dramatic look. I also want the feel of the characters to look sort of like coming out of the darkness about to murder. So no distracting nothings in the background and a bit of emphasis on the murder weapon. The part of the photoshoot feel gives that dramatic look is to get the background black and the light dramatic that's all there is to it. The rest is taken care of by Ebony and Post Processing. Since I feel Post Processing is a cheat I like that Ebony get me about 90% there. The rest is Create layers blur the top layer and used blending to get the desired effect. As you change the blending modes the program views the picture in different ways like screen is as though a light is being shone behind the picture you are viewing. They all have there uses and reasons to be used. The only real thing I did is a bit of blend and brought out those weapons with a layer mask. I feel that if the picture is taken correctly Post processing should take no longer than a few minutes. Some people love spending time time and more time burning dodging layer after layer. Me I battle to use all that. I love getting it right on camera and thinking how little Post Processing i will have to do. While I was shooting the neighbours were interested I what I was doing The look on their faces I would have loved to capture. They looked as though they were the would be victims with jaws dropped and a scared look on there faces. Who ever said photographers were fraidy cats? Just look what we have to work with menacing look people that look like they want to kill you and they got weapons at the ready. All in all a successful day was had by all so much so that Alan even left his make-up on the scare his nephews and nieces.

Wednesday, 25 March 2009

The Halloween Serial - Shoot 1 of 5 (for now)

Pictures from shoot at Studio
Model/s: Aiden
Make-Up: Ebony
Photographer: Henrik

Equipment : Canon 40D
Lens : 28-105 F3.5-4.5
Aperture : F8
ISO : 100
Shutter speed : 1/166 - hey thats what the properties say???? was set to 1/160


Welcome to the start of my little pet project: The Halloween Serial.
Yes I'm not kidding and just in case you are wondering, yes, it is getting close to Easter.
No, I'm not anti this or that, I just figure that the sooner I start the project the sooner I can finish it. Maybe I can even sell a pic or two before the insane rush for posters, I wish. (This pic may just already be ready for print on one).

Well I was a just minding own business a while back and one of those thoughts, you know those ones that that are guaranteed to require lots of effort to fulfill, popped into my head.
Well the thought is a bit cheesy but I like a bit cheesy, Halloween is cheesy, so cheese it is.
The theme will be the 4 main characters of Halloween and one extra as the intro. Each of these characters will be serial killers that like to prey on their victims using their weapon of choice. Jack likes his knife, hey that's how you make a jack-o-lantern.
Who knows? I may add an extra one or two later.

The day was a bit odd. It started out by photographing two female models, well groomed and looking lovely on camera.
Ebony, IMO one of the Durban's best theatrical make up artists, can do wonders with that set of brushes and pallet of colours. She first did the lovely make up on the models and then set down to the task of making Aiden look like the Jack-o-Lantern serial killer.
These shoots can be really enjoyable. I will explain.
The model type shoots are cool and I do enjoy them. You get to know the models and most of the time it is really nice.
The themed stuff with someone like Aiden can be really fun. Like when the make up is being applied to Aidens ear he cringes and shouts out "its like a dog licking my ear" well that set the tone of the shoot for me.
When you are doing a theatrical type shoot I feel the sillier and funnier type things can give you better results from facial expressions than a whole series of, "lets try this or that".
Models don't have to look pretty because that's not the point.
"Aiden growl" Aiden goes,"GGGRRRRRR" that sort of thing is fine and everyone seems to enjoy the relief of it.

The other thing that feel is important when you are not working with professional models is that you choose them carefully. I'm not shooting stock or for an agency yet so my models are generally not professionals and while I do understand that for certain shoots a professional model is required, for my projects enthusiastic people are just great. I try to find people that are interested in what I want to shoot and match the theme. Like Goths for a Goth shoot - metal heads for a serial killer, shoot you get the picture. A Pro can do just about anything you ask of them. An amateur won't really know what you are after, but if they are say a metal bassist, and you ask them to do the classic wide-stance-while-they-are-playing-the-bass-pose they will know exactly what you want, and hey presto not too much "move your legs apart - some more - some more - just a bit more" directing.

Enough waffle, on to the shoot. This one's simple: one light and big soft box. I wanted some dramatic lighting so I moved Aiden close to the softbox and checked to see how the light fell on the far side of his face. The more the light fall off the more dramatic the subject will look. Well that's the classic photographic thinking anyway. So close to softbox Aiden. I then draped him with a black cloth. All I really wanted is his face and the knife. The back ground was also a black sheet and nicely out of focus so it was pretty much pure black. The 500WS strobe was at about 50% power, not that it means much, but the histogram for Aidens face looked good so I went with that. The softbox was about 45 degrees to his face and and about 50cm away from him.

This one's a bit of a long one on the post processing side and I'm no 'shopping expert. I don't have a big studio, so guess what, you can see all my paraphernalia in the background to the one side of the backdrop. Away with a few easy brush strokes, that done, onto the next step.
I wanted the yellow orange in the face and hand so hue saturation adjustments were done. Also I had to colour Aidens hand as It was not painted. A selection and a few clicks and hey he has a yellow hand. I don't think you could do anything like that to the face as it would look to shopped but the hand lacks the detail so I think it looks OK. Everything you do needs to be in layers - my partner has drummed that into me (I'm a SP - Shop-a-phobe you see). Next I make a copy of the background and blurred it with Gaussian blur and then went to blending properties and selected linear burn.
It darkened it and gave just the right effect that dark rich edgy feel that I wanted.

Well that's how I did this one. Please feel free to leave comments. Jack will get back to you

Sunday, 15 March 2009

Pinetown Rally Streets


Pictures from shoot at Pinetown Rally
Model/s: VW and Toyotas
Make-Up: Drivers and navigators may have been but hard to ask as driving by at high speed
Cars makeup consisted of lots or racing parts and stickers
Photographer: Henrik

Equipment : Canon 40D
Lens : Canon 70-200 F2.8 l
Aperture : F2.8
ISO : 1600
Shutter speed : 1/100
Other Equipment : 580 EXII 430EX Manfrotto monopod

I love motorsport. I really enjoy it. LOTS. Part of the reason I enjoy it soo much is its a team sport and I don't mean just driver and navigator. What I'm talking about here is the behind the scenes stuff. Ive had the privilege of being able to hang around and see these guys at work. The cars can come in and about a quarter of the car is missing or damaged I'm not kidding about that either. These guys from the team manager to the coffee maker will slave through the night to make sure the car is prepared and ready to run the next morning.It goes something like this Team manager " We need an engine changed the gearbox changed the front suspension needs changing and brakes need new pads. " teams chief mechanic goes " Is that all ? " Team manager goes "Thats it !! how long?" Chief mechanic goes " MMM 15 for motor 15 for the box 25 for front suspension and 5 for coffee. Thats 60mins chief." OK so maybe Im exaggerating a bit but really the team repairing the car work at a pace I wish that all mechanics could work at and they do it right and in sometimes very unfavourable conditions. These guys are what will make a team win or loose and are as important as the driver and navigator. Im glad to see motorsport is being supported by the fuel guys and quite a few new sponsor names are starting to appear on the cars. This is good. The motorsport community has been hurt by a lot of sponsors moving to other sports as they feel their companies will receive more exposure at these other sporting events. Having said this one needs to realise that many of the guys that are now competing, are doing so from their own pockets, and the big factory teams are only awarding the top drivers spots. Yes the manufactures try to help the privateers by offering parts at discounted rates but still it takes lots of money to prepare a half decent rally car. All of the cars really were nicely turned out and I'm sure it was a bit of extra spit and polish for the crowds and sponsors benefit. Thanks teams all the cars looked super. This rally stage was held on the streets of Pinetown and even though the stage does not really make that much of a difference to standings of the Rally drivers, Its still a whole lot of fun to watch and needless to say the drivers and navigators do their utmost to impress the crowd. I say it wont make much difference to the standings as the stage is only about 2.5km long and all tar most of the other rally stages are 15kms plus and on these stages you really need to be on your toes and serious driving skill to just stay on the dirt not even to mention to do good times and of course you cant achieve the speeds that you can with a tar surface. It may not be the important part of the race but it does bring the rallying to the people and up the awareness of the sport and better exposure to the sponsors oh and its real fun to watch - did I mention that?

From a photographic point of view my choice of taking pictures of at this stage was the about the worst you could possibly think of, we are talking high iso and flashes and crowds that can be rather uncooperative at times. But hey if you set yourself easy challenges you generally don't learn too much. I started out with using my 580EXII flash on my camera and then placed a slave on the ground with a bare bulb Tupperware light modifier on top of it. Hey that light modifier was a real steal (literally from the mother in law's kitchen cupboard) and works really well.
In these situations I really will have to invest in a set of pocket wizards Canons we trigger by the light thing did not work very well and the flashes had to be close. Crap system on Canon's part but at least it goes off if you at just the right angle etc. That ruled out lighting from a distance so 580 on top and just in front of the safety fences was a 430 on slave a nice marshal placed it there for me. I would have liked to do more with the lighting but due to limitations the pictures I don't think came out so bad. I learned a few things but those I will tell in a later post. I picked this corner because its a corner after a long straight and heavy breaking will let those brake discs glow. As it turns out I got a few pictures of just that. Please if you are one of the competitors please let me know. If you are wondering I have many other photos at least one for every competitor that participated.
That panning with the subject skill came in very handy. I used a monopod for supporting the lens and I feel that after a tripod a monopod is the most important piece of equipment in ones equipment line up. Even if you have a IS lens it helps to support the camera and your arms dont have to keep on working as hard. The flash helps freeze the action but to frame the shot you need to pan with the car as it wizzs by.
I dont really talk much about post production but to be honest here the iso 1600 requires noise reduction. I find that Canon's own DPP software does a really good job of the noise reduction. Also I found myself increasing the exposure by about 1 stop or so. Most of my post production stuff is a levels watermark and size reduction.
Well next time I get to photograph the event maybe I will have some pocket wizards.

Saturday, 31 January 2009

Flashing the Fairy


Pictures from shoot at Durban Botanical Gardens
Model: Tanja
Make-Up: own
Photographer: Henrik

Equipment : Canon 40D
Lens : 50mm f1.8
Aperture : f 10
ISO : 200
Shutter speed : 160
Flashes : Canon 580exII and 2x Canon 430 ex

Other : Manfrotto Tripods, sync cable, shoot through
umbrella and mount thingy


Ah! Durban. Well, what can be said about it? We could say it's Africa's playground, we could say it has the world's best beaches, we could also say it is the worlds greatest HIV city and we could even say the worst politicians all hail from this city.
But today, the 31st day of this January month, in the 9th year of the 21st century, on approximately the 1st second in the 49th minute of the 10th hour, or thereabouts, I will say only Durban was @#$%^*& hot and humid.

The Botanical Gardens is one of Durban's highlights in my opinion. Many wedding photographers use the gardens as their creative shoot one-stop-shop. I can understand why. There are many great locations and different looks you can get just by moving 30 metres or so. Too bad most of the wedding photographers use about only 6 of the 100 plus spots that I can think of in the gardens to set up their shots.

Well enough moaning about the originality and creativeness of the wedding photographer and his 6 spots, I enjoy the gardens and love just going for a walk leaving the odd sync cable there and making a mad dash across town to retrieve it. etc. Seriously though, I like the surrounds and the plants are all labeled if you want to really know what they are called, and if you want they even have a guided tour. I mostly like to go and chill and sometimes take a camera along.

And now enough of the waffle, onto the pictures.

I have included a setup shot. These setup shots are a rarity. This one was taken in error. I normally plan to take a setup shot but due to (what ever factor you would like to enter into this space) I normally forget. I took this in error while I checking a setting. As mentioned the gardens have many great spots and if you go and look for it you will find this one. The tree has a hollowed out section that was just begging to have a flash placed there and used as a backdrop. With this in mind, our dear model and friend, Tanja, has been pestering us to do a fairy type themed shoot for a while. We are comfortable with her and her with us so when we go to do something like a fairy shoot with her all dressed up and me stuffing around trying to get everything just right she does not complain or get flustered she just takes it in her stride or hop depending on which bug wanted a bite.

Did I mention the bugs just loved eating Tanja, myself, my partner and my little one.

Back to pic. I wanted to kill the ambient light, and bugs, a bit (lots). So onto a tripod goes my 580 and into master it is put. A little note here : I can really understand why the pro guys use pocket wizards / sky ports because when I put a grid on the flash it did not trigger the other flashes. The reason is to do with a preflash the 580 puts out to the 430's. If the 430's don't see the actual flash from the head part, they don't go off. They don't talk with the red sensors at the bottom as some people think. So bang went the idea of just lighting very selectively.

Well, fill light the 580 will be, power was at 1/8th and zoom set to 105mm and was a far far way away. The one 430 was put facing upwards behind Tanja to light the tree at 1/4 power and at 14mm (diffuser panel out). The final one was put on a tripod on the umbrella mount thingy behind an umbrella at 1/2 power to give a nice soft light.
And then happy snapping away I went.

I am happy with what I got, but there are a few things I would have liked to do different. A bare bulb behind Tanja would have been nice (ps I forgot it at home - the tupperware thing) and the fill light perhaps a bit softer. Like behind an umbrella soft. I would like to know if the 580 would have been able set off the other flashes but I did not find out due to time, bugs, heat etc. But otherwise I'm happy. (not - I neeeeeed pocket wizards more flashes a new camera l glass ..and.....and............)

Sunday, 18 January 2009


Pictures from shoot at home
Model/s: Flower - Not very Talkative but very good at posing and standing still

Make-Up: We tried putting on mascara but decided to go natural

Photographer: Henrik

Equipment : Canon 40D
580EX II flash
2 x 430EX flash
blue card board
snoot
grid
Shutter speed : 1/80
Appeture : F10
ISO : 100
Lens: EFS 18-55 (kit) @ 55mm

So I go to a friend on the weekend to say hi borrow a car/truck etc and he shows me these flowers on a strange looking plant. Well they do look sort of cool and different to the usual sunflower / rose sorta stuff. My friend tells me they only bloom once per year and only during the evening and by the morning they are dead. So I said oh that's nice. I don't really like taking pictures of plants because there does not seem to be much of a challenge. As well as the plants freek me out they seem too co-operative and very quite. I mean you pose them and they just stay there and don't complain. It just spells out serial killer in my mind. But anyway so he tells me he wants some pictures of the flower. I return the car and then he grabs a flower off the tree and hands it to me and says 'when you come tomorrow bring me some photos of the plant.' Oh OK I said, hey he's loaned me his car and did not even ask for fuel so serial killer plant photos it is.
Hey I need his car / Truck occasionally for a bit time to time and its always good to go say hi and it means a lot to him when I bring a few pics of things Ive taken. So ive been learning how to light the strobist way, still a way to go but its good learning, which I like. The guy who runs strobist is cool and very happy to share his knowledge via blogger.
Back to the killer plant so how to do light the evil thing.

To me I wanted to give the plant a glow so to do that I light from the back of the plant with a 430ex on 1/8 power. I wanted to get the side top light to catch the petals but I also did not want the light to go all over the show. Enter the home made snoot, it was made to go onto my 580ex it seems to do a good enough job. the Flash and snoot attach with hose shoe adapter was mounted to the tripod and the flash set at 1/8 power. Last but not least I want the centre thingy, cant remember what its called, to be lit so a another home made item , a grid made from card board, to help only light the to fall in the centre bit. That flash was set at 1/4 power as the card board seems to soak up the light quite effectivly. So there you have it. A picture of the serial killer plant. Please if someone can tell me what the plant is I would like that. I will look as well if I find out I will post the name. Thanks.

Friday, 26 December 2008

Photo By Henrik December 2008, Umbilo, Durban, South Africa

CAMERA : CANON 40D
ISO : 100
LENS : 18 :55 KIT @ 27mm
APERTURE : F8

This photo was a real tough one Ill walk you through it step by step stay with me on this one people.

Step one get camera and put on tripod.

Step two press button for 20 seconds plus or minus

Step three look at picture

Well there you have it another amazingly wildly hard picture to take.